Mercury Glass Coasters DIY

mercury glass coasters

Coasters.  They are the sacred barriers between beverages and ring-free furniture.  The first nice coasters I ever bought were from Pier 1 in college and we still use them, but they were only a set of four.  Sometime last year, my mother-in-law had coasters she had never used.  They were the kind you can put little pictures in.  I am not a fan of putting a sweaty glass of water on anyone’s face (even if the picture is under glass) but I knew I would need more than the four coasters I already had and that I could figure out how to give them a makeover.

before photo of coasters
This is what they looked like before.

I’ve been on a mercury glass kick lately and naturally I checked Pinterest to see if it was something that could be created via DIY.  Turns out it can be and it was so, so easy.  It also turns out that the coasters are perfect companions to the two most important beverages: coffee and wine. ?

Supplies needed:

  • Glass coasters (or tiles would work but they must be clear)
  • X-acto knife
  • Ball point pen
  • Glass cleaner
  • Distilled vinegar
  • Krylov Looking Glass spray paint
  • Paper towels
  • Vinyl bumpers

Directions:

I first used the X-acto knife to remove the vinyl bumpers.  Next, I tore off the little plastic picture holders.

Remove vinyl bumpers
Then remove photo pocket

After that, prepare to spend a lot of time scraping off the white paint on the back that makes the foggy frame for the photos.  I switched back and forth between the X-acto knife and the ball point pen for this.  I was afraid of scratching the glass too much with the knife but found if I held the pen at an angle the edge around the ball point worked just as well without the risk of scratches.  It took a long time to do all four coasters and it got rather dusty but it was in some ways soothing.  I kind of compare it to those mini sand boxes that sit on desks and the rake is smaller than a normal table fork.  My own little zen garden (we won’t talk about the knife in it ?).

Scraping off paint
Scraping off paint

After all the paint is off, the rest of the project goes really fast!  Use glass cleaner to clean the backs of the coasters and let dry completely.  I got a bit excited with the next part and forgot to take pictures of every step.  I splashed some vinegar onto the coasters (the same side the paint was on to hide imperfections).  For this, I took a water bottle with a squirt top and filled it with vinegar.  I drizzled it over the coasters and the vinegar made pools on the coasters.  Then I quickly used the spray paint and sprayed over the vinegar puddles.

Spray paint over vinegar puddles

After letting it dry for a minute or so, I used a paper towel to blot the paint and absorb the vinegar puddles.  I let it dry a for a few more minutes and repeated the process again.  After that dried, I spray painted it without the vinegar and then blotted that with one of the damp paper towels to pick up smaller specks of paint.

Once they are fully dry and look perfectly imperfect (as mercury glass should), add the vinyl bumpers to the same side that was painted.

Vinyl bumpers
I found these at our local hardware store
Back of finished coasters
The backs are finished!

I then flipped them over, cleaned the tops with glass cleaner, and then poured a glass of wine.  The next morning I tested them with coffee – my Tiffany mug looks cute on them, no?
wine and coasters

Coffee and coasters


Heightened Entertainment: DIY TV Hutch

TV hutch from left angle

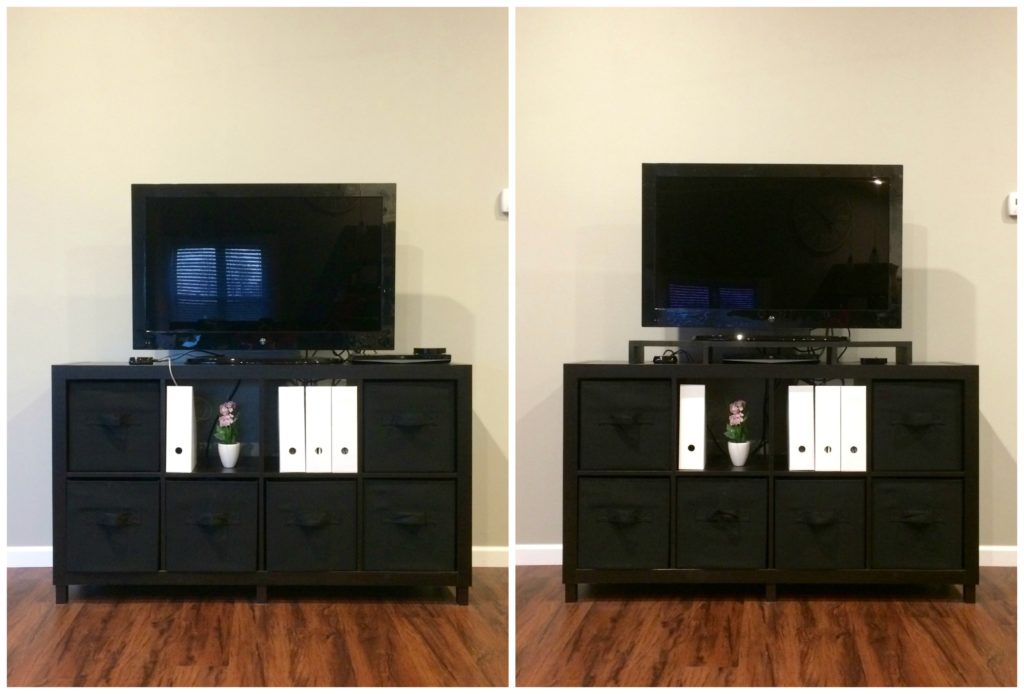
What a week we have had!  Landon brought the flu home with him last Thursday.  We had planned to visit my parents over the weekend but that was quickly cancelled.  Then Saturday night, I came down with the nasty bug.  We are both feeling much better but the unexpected weekend home was anything but productive.  ?  Last night was the first time we were both feeling normal again.  Tonight we felt so good, we finally installed the hutch we made to give our TV a boost and create more organization with our streaming devices.  This project has been in mind for at least a year and is finally executed and complete!

Our TV stand is nothing special, just some good ol’ fashioned cube furniture from Ikea.  But I actually love the simple look and versatility of the squares.  They also can store a bajillion things and make great hiding places when you find out people are coming over in 5 minutes (not that I have personal experience with that last one…).  Anyway, it has bugged me for years (and 4 prior addresses) that my blue-ray player is just a teensy-bit too wide to fit into one of those cubes so it always had to sit on top, off to the side.  I like symmetry (seriously, I had to have an even number of bridesmaids so it was symmetrical on both sides of me) so this was a problem I saw every time we sat down to watch the idiot box.

before and after of entertainment unit
Before and after. Just looks a little more grand, don’t ya think?

What we did:

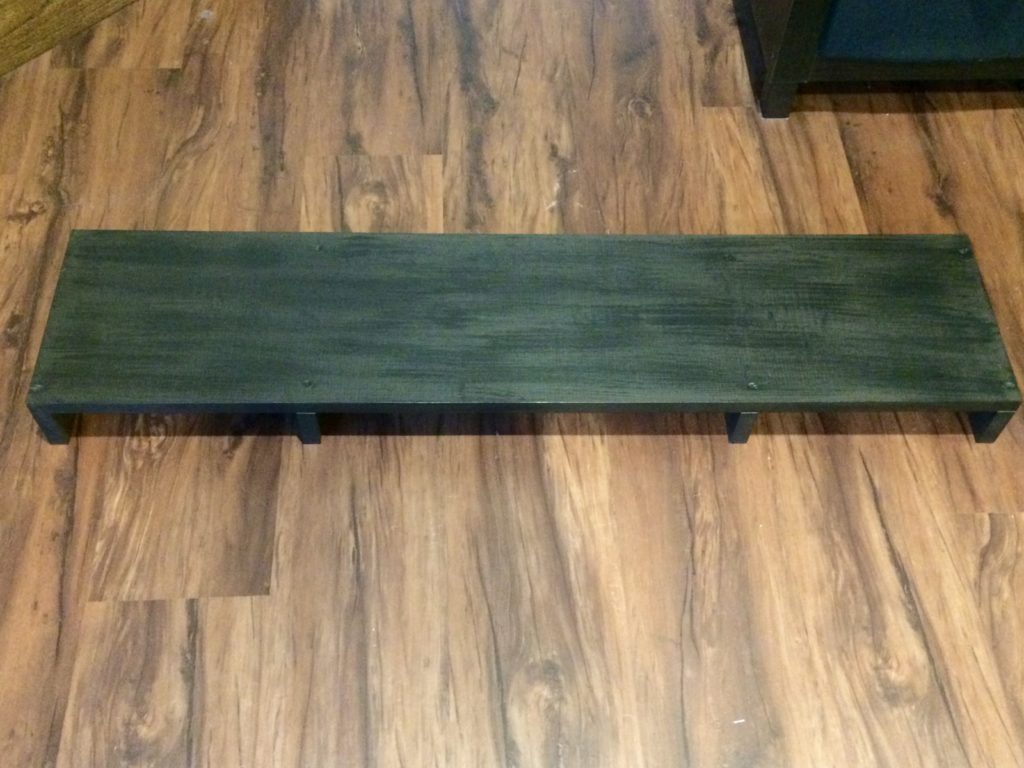
First, have husband cut a board leftover from the construction of house.  Second, wife searches Pinterest for the paint color that matches the infamous black-brown Ikea uses.  Third, husband constructs and paints stand.  Next, wife is completely repulsed by how the color that MULTIPLE pins said was right but is clearly so, so wrong.  Wife tells husband it needs to be more brown but also black.  Husband gives paint to his dad to add black paint to mix.  Husband repaints stand.  Wife is still disgusted.  Husband and wife go to local hardware store for the darkest brown they can fine.  Husband repaints stand.  Wife is pleased with brown color but it needs black to show through and give that grain look.  Husband borrows black paint from his dad.  Wife uses a bristle brush and just a tiny bit of black paint and creates wood grain affect.  Wife is pleased with outcome.  Husband is thankful he doesn’t have to paint the same darn thing every week anymore.

DIY Hutch
The DIY hutch before “installation.”

See, every story gets a happy ending? ?

DIY TV hutch from right angle
What a pretty hutch ?

I love that all the electronics fit underneath in a symmetrical fashion.  I am also happy that it gives a little more height to the whole entertainment stand.  We already had added legs to the unit last year and now it just looks even better with our vaulted ceiling.  Like it belongs. ?

DIY Tile Magnets

Landon and I moved into our house just a couple months before Christmas in 2015.  It was our first Christmas as newlyweds and we were blessed to receive countless Christmas cards from friends and family.  I couldn’t wait to display them on our fridge!  There was just one problem – we only owned a handful of magnets.  I looked high and low and just could not find any I liked so I decided to make my own.  The great thing is that I paid only a few dollars and have enough tiles to make over 100 magnets!  I do not need that many but they would work great as gifts (for everyone you’ve ever met ?).

Supplies:

  • Backsplash tiles (I got this one from Home Depot)
  • E6000 glue (can find at your local craft or hardware store)
  • Magnets (the size will depend on the size and weight of your tiles)

The tiles come on a mesh backing.  All you have to do is peel each tile off and it’s ready to assemble.

Add a dab of glue to the middle of a magnet and stick the tile on.

Wait a full 24 hours to make sure the glue is dry.  After that, stick them on your fridge and put ’em to work!

The great thing about using backsplash tiles is that there are TONS of options to choose from and even if you get a 12×12 inch tile for closer to $15-20, you still will be able to make a ton of magnets for not that much.

The Most Amazing Chair Ever…& New Curtain Rods

I am so excited about this post and it feels like it has taken forever to share because I have not been home at the right time for decent lighting to take pictures.  I love sunny winter days but they really hurt taking clear pictures in rooms that face south.  Never mind that now, I was able to figure out some creative lighting techniques after work and now have pictures!  Without further ado, here is my post:

It all started when we rearranged our sectional in the living room to make room for our Christmas tree.  It turned out we would have a lot of floor space after the tree came down if we left the couch where it was.  My husband has always wanted a recliner and I have always wanted a fashionable chair.  A trendy push back was the perfect solution!  Set with a budget in mind, we went wandering into a furniture store on New Year’s Eve.  I never expected to find the perfect chair at the first store (and it was on sale for $200 less than I budgeted for!) but we did and ordered it the same day.  Last week we got the call that it finally was in and ready for pick up!

Saturday, Landon and I had back-to-back eye appointments (gotta keep those peepers healthy! ?) and we decided to take an early Valentine’s lunch afterwards ❤️.  It worked out perfectly that we would already be in the city the chair was in and could pick it up after our little date!

The comfiest chair ever.
Getting the chair also gave us the push we needed to finish the curtain rods we were making for our big living room window.  We have blinds so the curtains were not needed for privacy or blocking light.  I just felt the window needed to be framed out.  We took a dowel rod, painted it black, and cut it into two 18 inch rods.  So easy but we seemed to take a three month break between each step! ?

Short curtain rods (and the chair)
And there you have it.  The newest addition to our house!  (And yes, I did write this post reclined in aforementioned comfy chair and periodically taking breaks to gaze out our nicely framed window. ?)