Simple 4th of July Door Decor DIY

I’m back!  I took last week off while we were up in the Northwoods vacationing in a cute little cabin.  But now I am back refreshed and relaxed.  Two days ago I had the brilliant idea to deck our front door out with some 4th of July decor.  This is crazy, because 1) we just came back from vacation and 2) we don’t have any craft stores in our town and there was no way I’d make the hour drive to one.  So I got creative with a simple 4th of July door decor and I had time to do it thanks to the prep I did before we left!

Simple 4th of July Door Decor

I wanted to make something that wasn’t a traditional round wreath.  I did stop at a couple stores in town on my way home from work but wasn’t impressed with the options they had.  They were all a little loud for me.  I like things simple so I went home empty handed and searched the house.  And what did I find?  Bamboo skewers!  Yes, the things you make shish kabobs with.  (Confession, I’ve never made shish kabobs in my life and I only have the skewers because I used them to make a diaper bouquet last year for my sister-in-law’s baby shower. P.S. Our niece turned 1 last week – Happy Birthday Alicia! ???)

What I did to make this 4th of July Door Decor:

To make the stars sturdier, I glued two skewers together and used five of the double skewers to make stars.  I made three stars so I could paint each one red, white, and blue.

Hot glued two skewers together
Then glued the double skewers together into a star
Painting the stars - and making our yard patriotic too!
Painting the stars – and making our yard patriotic too!

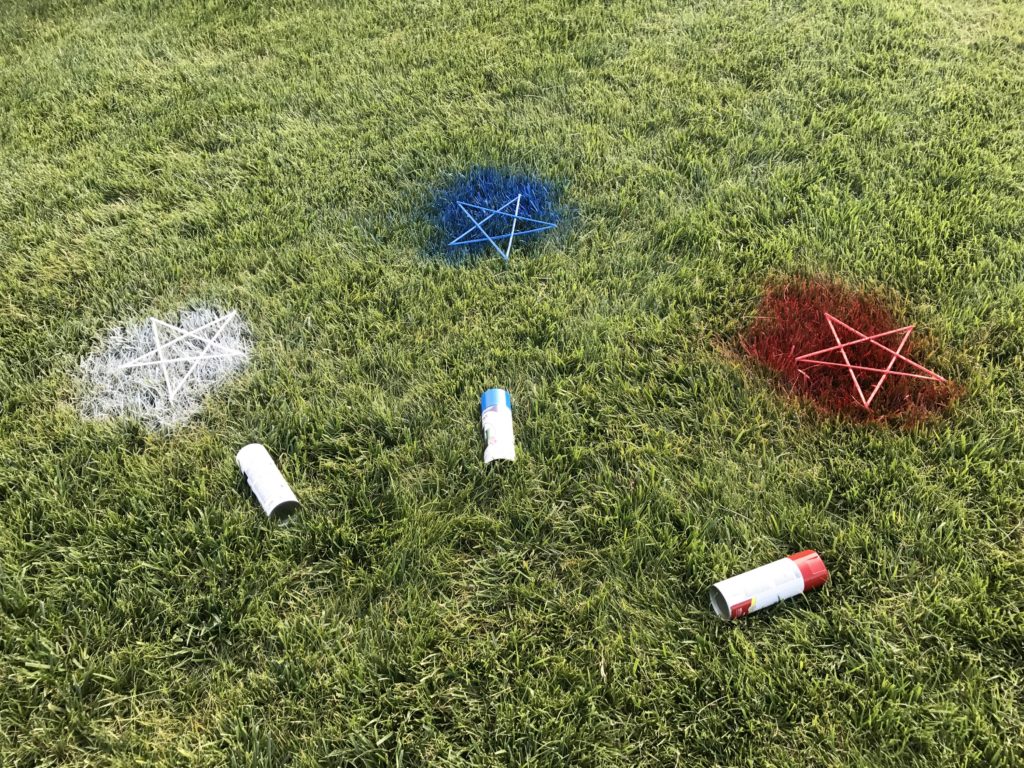
Once the paint was dry, I used fishing line to connect them.  I put dabs of clear nail polish on the fishing lines because according to my husband the knots I made were not the “most secure.” ?  All that was left was to hang it on our door!

Simple 4th of July Door Decor

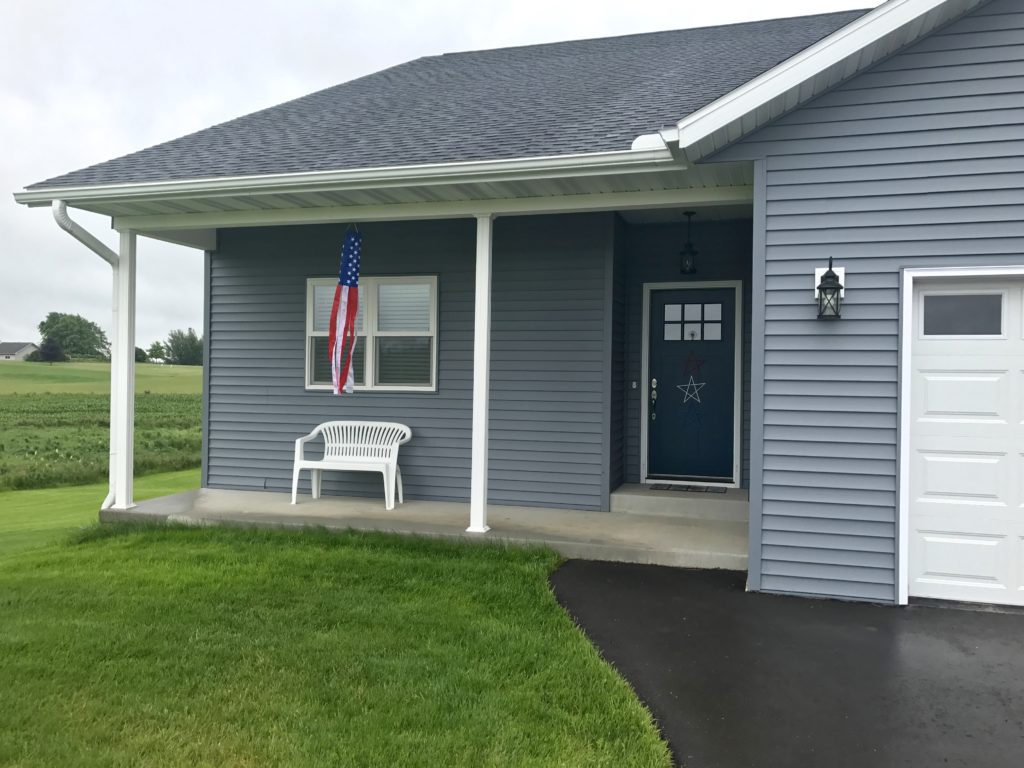
From a distance, it’s much more noticeably in person than what the camera captures.  I just love how simple it is.  And the windsock is from my parents.  ?

4th of July decor
Sorry for the gloom, it had just rained ☔️

Hope everyone has a great 4th of July!  ??

SaveSave

SaveSave

Vacation Planning – the week before

Maybe it’s because I married into a family of teachers, but it seems like summer is a popular time for vacations.  Next week we are heading way up north (practically Canada ?) with my parents and are renting a cabin for a week.  In just over a year, this will be our 3rd week-long vacation and in this time I’ve learned a few things about vacation planning to make life easier that I thought I’d share with you.

Roadtrip!
Roadtrip!

I once heard that planning a vacation is half the fun as going on it and I would totally agree!  Typically, I start planning things wayyy far in advance but really the brunt of it needs to happen the week before.  I also have heard most people feel they need a vacation after coming back from one.  This is my list on how to cope better with that feeling!

Food

On Sunday I sat down and meal planned with a little more vigor than normal.  I wanted to make sure I made the right amount of meals and that all leftovers would be consumed before we leave.  This way the day or two you are busy packing, you don’t have to worry about cooking (since you have leftovers) and you won’t have to throw anything out.  Speaking of…

Clean out your fridge!  Our trash pickup is every other week and it just so happens to fall the day before we leave.  I am going through it making sure nothing was forgotten and could get pretty rotten while we are gone.

Place anything that could go bad in the freezer.  Bread is the number one staple that comes to mind.

Lastly, think about what your week will be like when you get back.  Will you have time to cook?  Or, more importantly, will you want to cook when you get back?  In March we were gone every single weekend.  It was easy for us to stop at our local food co-op on our way home and grab an already cooked rotisserie chicken and some lettuce.  It was great because we had enough to last a few meals before we got groceries and it’s actually much more affordable (not to mention healthier) than fast food.

Money

Most people probably hit the ATM before they leave, which is great.  But have you thought about bills that may come due while you are gone?  I have issues with letting up control so I don’t like to go the auto-pay route.  I have a list of our regularly monthly bills and their due dates so I don’t have to worry about missing the email statement.  We have some that need to be paid while we are gone or right when we get back so I will be paying those tonight and checking them off my list!

Cleaning

If you’re like us, you like your house clean but some weeks you have better things to do (like nothing ?).  Whenever we decide to tackle that clutter, I always walk in the door the next day after work and feel a sense of calm I didn’t know I was missing.  It’s glorious!  Why should vacation be any different?

No clutter on these counters!

I don’t know what your cleaning life is like, but when we clean it typically falls on a weekend or the earliest is Thursday or Friday.  That’s all fine and dandy most of the time.  Except when you are leaving Friday and will be gone for 11 days.  Some prep work must be done!  Sure, it takes more planning but you already are saving time with reheating leftovers, right?  And the feeling of coming home to a clean house is amazing!  I’m not saying you need to clean like the Queen is coming (I will vacuum our hard floors but I am NOT steam mopping), but just take time to pick up a little clutter here and there.

Laundry

You come home to a clean house, might as well come home to clean linens!  A day or two before, wash your sheets.  Bonus points if you can put fresh ones on before you leave!  Also do the same for towels – bath towels, hand towels, kitchen towels, etc, etc.  There’s always laundry from vacation so why not get all the other stuff out of the way beforehand?

Another note on laundry, a week before you go start thinking about what everyone needs to pack.  Set a certain day as the last day for anything to be washed that will get packed.  Today was that day for us.  This means if Landon wants a certain pair of cargo shorts packed, he should not wear them tomorrow. ?

Other little tips:
  • Roll your clothes – it seriously takes up less space.  Packing cubes help even more!
  • Unplug electronics.  TVs, toasters, coffee makers…
  • Speaking of coffee makers, throw out the grounds and give the carafe a wash.
  • Turn your air up so it runs less often to save energy.
  • Turn your ice maker off and if you have a dispenser in your refrigerator door, lock it.
  • Close blinds/curtains in rooms that face south – it will help keep the house cooler so the air runs even less.
  • Ask a neighbor to collect your mail so it doesn’t build up.
  • Lastly, relax!  It’s suppose to be vacation after all! ?

SaveSave

DIY Mirror

DIY Mirror
DIY Mirror
This post should really have a second title:  “How to get Your Husband to Not Like Menards”
hallway table
Hallway table

We’ve had this table in our hallway for the past year and a half and I love it.  But I have never really known what to hang above it.  A few months ago I decided a nice big mirror would really anchor it down and help fill a very long boring wall.  There was just one little problem.  Giant mirrors are expensive and I have a lot of walls to fill with things.  So a DIY mirror was the way to go.

CB2 mirror
Source

Back in March I was browsing CB2 and fell in love with the many pieces of this mirror.  The store had displayed 4 of them together and it was grand and eye-catching.  One wasn’t big enough for me but 4 was much to large (not to mention the price tag for multiples).  I then saw some people on Pinterest made large mirrors using many mirrors from the dollar store.  The lightbulb went off! ?

I headed to our dollar store and bought 9 mirrors all 11×14 inches.  At our local hardware store I had them cut a sheet of 1/4″ plywood to 36X45 (we planned on a 1.5 inch border around the perimeter for framing).  I started to take the mirrors out of the frames while Landon screwed in two brackets to one side of the wood and added anchors to the wall.

Frames bent back easily to remove mirrors
Frames bent back easily to remove mirrors [and yes, that’s our ceiling and light over our kitchen table :)]
After all that, we hung the wood on the wall and called it a night.  We left it there for a few days, making jokes about what the artist meant and saying we could stare at the “art” for hours.  What can I say?  We lead exciting lives. ?

Wood hung on wall
The wood has a soothing natural look, no?

After all that fun, we got back to work gluing the mirrors to the wood.  Landon used some heavy duty caulk that was leftover from some house thing or another (Locktite PL Premium Polyurethane Construction Adhesive).  I had marked sections on the wood to place the center mirror down first.  We then worked our way around that mirror gluing all 9 down.  Then we called it a night and left it on a card table in our great room for about a week.

Gluing the mirrors down

We then had a “pretty nice little Saturday” (get the Old School quote?) running errands.  Remember when I said this post could also be called “How to get Your Husband to Not Like Menards”?  Well we went to Menards to pick out trim to frame the mirror.  And I probably spent a good 30 minutes trying to make up my mind.  Sure they had lots of options but nothing was just right for me.  Poor Landon was going insane following me down the same 3 aisles!  He’s a saint. ?  Anyway, I finally decided to go simple and got plain flat trim, some simple corner pieces, and black paint.

The trim
The trim

Landon cut the trim and after painting the trim and corner pieces black, we used more of that heavy duty caulk to secure it to the wood border around the mirrors.  Then all that was left was to hang it up once it was dry!

DIY mirror
The finished project!
DIY mirror
And from the other angle

The mirrors are not perfect and I suspect with time they will take on a more fun-house effect but I love it!  It really wouldn’t take long to do this project in an afternoon and it was so easy!  Plus, a project you get to work on with your husband equally is fun too. ?

DIY Makeup Remover

I have sensitive skin.  It is both a curse and a blessing.  Well, maybe the only blessing is I have an excuse when the weirdos at the mall try to get me to look at the overpriced skin care they are selling.  I suppose normal people could just lie and say they have sensitive skin…  Moving on!  The area under my eyes seems to take the brunt of my sensitivity.  I have had 3 different steroid creams prescribed to me in the past decade.  It is not fun to have pain under your eye every night you wash your makeup off.  I also have dry skin.  Cleansers dry it out too much and even sensitive makeup remover towelettes feel like a thousand tiny needles are poking me.  I finally found a brand that doesn’t hurt AND removes my eye makeup but it’s about $10 a month and is sold nowhere in my town.  Using Prime costs even more.

Enter, my own DIY makeup remover, sensitive skin friendly and so, so, so cheap and easy to make!  You can make a big batch to last a month or a little batch to last a week.  The best part is that the ingredients are all good for your skin.  And the other best part is that you don’t have to scrub your eyes like crazy to get off mascara.  Just a few gentle wipes and it’s gone!

DIY Makeup Remover
DIY Makeup Remover

Continue reading “DIY Makeup Remover”

4 Ingredient Rhubarb Crisp

Slice of rhubarb crisp

As the grass greens and the days get longer in the spring, it also means it’s time for rhubarb!  So when Landon brought home a giant bag last Friday, I knew rhubarb crisp would be in our future.  I think I have loved rhubarb my whole life.  I am my mother’s daughter.  As a child she would sit on a swing eating rhubarb straight from the garden.  Thats right, she ate it raw!  The summer Landon and I were engaged, I was cutting rhubarb and ate a raw piece.  I then offered him one.  It still cracks me up when I picture the look on his face! Continue reading “4 Ingredient Rhubarb Crisp”